All in all, we spent hundreds of hours combing through thousands of user reviews to put together a comprehensive list of the best robot kit soldering on the market. We then delved into these robot kit soldering further and put together detailed reviews so that you can easily pick the best robot kit soldering for your needs.
Best robot kit soldering


Related posts:
Best robot kit soldering reviews
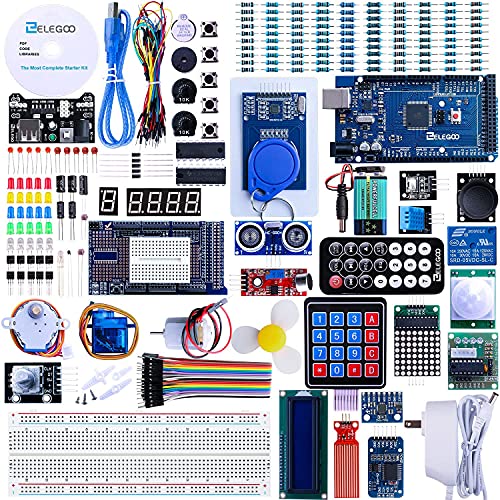
1. ELEGOO Mega R3 Project The Most Complete Ultimate Starter Kit w/ TUTORIAL Compatible with Arduino IDE
Feature
The MEGA2560 complete starter kit with more than 200pcs components.Free PDF tutorial in the CD (more than 35 lessons).
LCD1602 module and GY-61 sensor module with pin header ( no need to solder by yourself)
Nice package with clear listing and surprise including a nice small box to keep the widget such as LED , IC , buttons , diodes ,etc.
We have always cared about the customer experience and improve the product function details.
Description
Elegoo Inc. is a professional manufacturer and exporter that is concerned with the design, development production and marketing of arduino, 3d printers, raspberry pi and STM32.
Our Dream is to make the best price and best quality produce for customers.
So we would like to receive your valuable suggestions for our products and we can improve them for you.
Component listing:
25pcs LED ( white,yellow,blue,red,green)
1pcs RGB LED
10pcs Ceramic Capacitor(22pf & 104pf)
2pcs Photoresistor
1pcs Thermistor
5pcs Diode Rectifier (1N4007)
4pcs Electrolytic Capacitor (10UF 50V & 100UF 50V)
10pcs NPN Transistor (PN2222 & S8050 )
1pcs Tilt Switch
5pcs Button (small)
1pcs 1 digit 7-segment Display
1pcs 4 digit 7-segment Display
1pcs Sound Sensor Module
1pcs LCD1602 Module ( with pin header)
1pcs IC L293D
1pcs IC 74HC595
1pcs Active Buzzer
1pcs Passive Buzzer
1pcs RTC Module
1pcs DHT11 Temperature and Humidity Module
2pcs Potentiometer
1pcs Rotary Encoder Module
1pcs Joystick Module
1pcs Keypad Module
1pcs 5V Relay
1pcs IR Receiver Module
1pcs MEGA2560 Controller Board
1pcs Breadboard
1pcs Servo Motor (SG90)
1pcs Stepper Motor
1pcs ULN2003 Stepper Motor Driver Board
1pcs Prototype Expansion
1pcs Power Supply Module
1pcs HC-SR501 PIR Motion Sensor
1pcs Ultrasonic Sensor
1pcs ADXL335(GY-61) Module ( with pin header)
1pcs 3V Servo Motor
1pcs MAX7219 Module
1pcs Remote
1pcs 9V 1A Power Supply
1pcs 65 Jumper Wire
1pcs Water Lever Sensor
1pcs USB Cable
1pcs 9V Battery with DC
1pcs RC522 RFID Module
100pcs Resistor (10R/100R/220R/330R/1K/2K/5K1/10K/100K/1M)
20pcs Female-to-male Dupont Wire
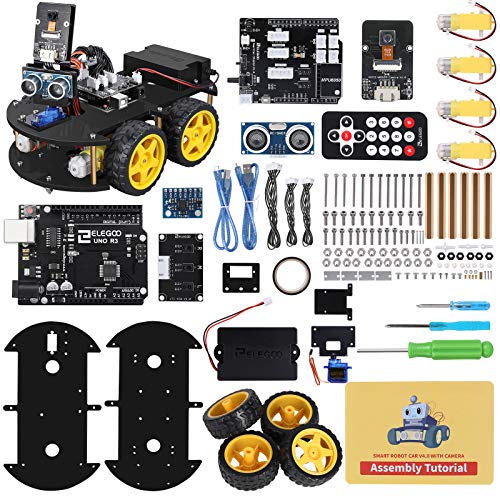
2. ELEGOO UNO R3 Project Smart Robot Car Kit V4 with UNO R3, Line Tracking Module, Ultrasonic Sensor, IR Remote Control etc. Intelligent and Educational Toy Car Robotic Kit for Arduino Learner
Feature
ELEGOO Smart Robot Car: An educational kit for beginners (kids) to get hands-on experience about Arduino programming, electronics assembling and robotics knowledge. It is an integration solution for robotics learning and made for Arduino education.Complete Package: Contains 24 kinds of module parts including obstacle avoidance, line tracing module, infrared remote control and also you can control it via phone and tablets of Android and iOS system, etc.
Easy to Assemble: All the module interface has been modified with XH2.54 ports as to make it much easier and convenient to assemble the car and reduce the chances for errors.
Refined Tutorial in CD: HD rendering instructions on how to assemble the robot car from scratch and all the necessary programs and codes are included. You can also download the same tutorials online in the following link: http://bit.ly/2jKlJMO
Upgraded Package Design: More minimalism design and make it a perfect gift for your kids and friends. Note(Applicable Age : 12+)To use Elegoo starter kits requires basic electronic knowledge. If the user has no experience, it would be better to have someone lead and teach them while studying.
Description
-Modified wiring and module interface making it more intuitive to assembly the car. Simply connect the modules together and the robot car can be built in a really quick way giving you a great sense of achievement to build up your own robot project.-Updated tutorial with more detailed instructions make it more straightforward than ever to realize the different function of the robot car.
-Improved remote control experience make it more fun and interesting to play with your kids
Component listing:
1pcs UNO R3
1pcs USB cable
1pcs V5.0 extension board V2.0
1pcs L298N motor driver board V2.0
1pcs ultrasonic Sensor
1pcs ultrasonic holder
1pcs servo motor
1pcs IR receiver
3pcs line tracking module
4pcs motor
1pcs remote
1pcs charger
1pcs cell box
2pcs acrylic
4pcs wheel
57pcs screws
37pcs nut
4pcs aluminum block
10pcs copper column
1pcs plastic box 1pcs CD with tutorial
Several DuPont wires
Several fix tools
3. IS ICStation Line Tracking Smart Robot Car Electronic DIY Assemble Soldering Kit w/ English Instruction for School Competition
Feature
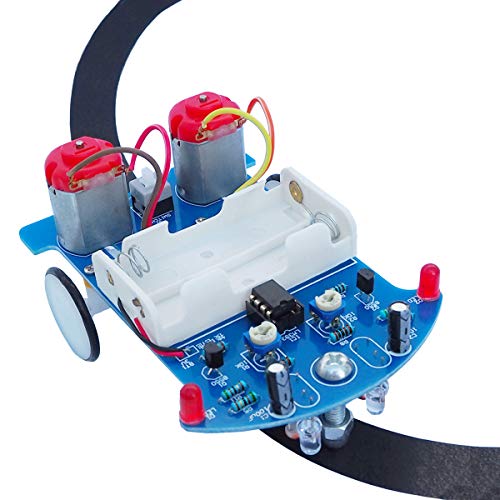
🚜ApplicationICStation robot car is widely used in school electronics educational competitions, it designs for electronic-lover and DIY beginner to learn about basic electronic knowledge and practice soldering skill. It's designed for electronic-lover and DIY beginner to learn about basic knowledge of soldering simple circuits, photoelectric sensor circuit, voltage cooperator, motor driving, infrared sensor, C51 MCU, etc.🚜Easy to assembleComponents' names are marked on board, and the circuit design is simple, included instruction. Motor: 2 pcs stepper motors, Tracking line width: 16 mm/0.63 inch, you can use the 1.5~2.0 cm black electrical tape on the ground to design the multifarious runway. Power supply: AA battery (not included).
🚜PrincipleSmart tracking car is based on the principle of the light reflectivity difference, when light emitting on the white and black items, the red LED and photoreceptor as the sensoring circuit to control the car running direction automatically, a photoresistance resistance is used to tell robot car whether it's on the right way or not, and run directly along the black tracking line.
🚜Warm tips(1) Please check part values and quantities against part list, always meter resistor values before soldering, understand all part polarities and orientations. (2) Please make sure all components in right dirction and right place; and check whether any soldering points with poor contact, this is very important in practicing and testing.
🚜ServicePlacing bulk orders please select the Pack of 5, as below, which unit price is more cost-effective. English instruction is inclused, and we provide free consultation to help users finish this project. Any question about products or delivery, please contact with seller at this page https://www.amazon.com/hz/help/contact/A243HB0NZWY05K
Description
Installation Steps:
1. Install circuit
(1.1) Install metal film resistor, DIP-8P IC socket, Self-Locking switch, Potentiometer, S8550, Capacitor, Red LED on PCB according to mark on PCB;
(1.2) Install Mecanum wheels. The support bolts of the caster are inserted into the hole, tighten the nuts screwed into the caster, and finally fit the caster and tighten;
(1.3) Install photoresistor and white LED on PCB reverse;
(1.4) Install battery case;
(1.5) Testing: Install your 2 pcs AA battery; Press on switch. If 2pcs white LED ON, the installation is successful. If LED off, please check the welding again.
2. Install mechanical parts
(2.1) Install the four gaskets on the circuit board;
(2.2) Insert a steel shaft from the center hole of the wheel and note that the direction is inserted from one side of the raised sleeve of the wheel. It is better to insert the steel shaft parallel to the smooth side of the wheel;
(2.3) Put a three-way sleeve into the steel shaft, close to the wheel, and then a gasket into the steel shaft, close to the three-way sleeve, installed in place, toggle three-way sleeve, should be flexible;
(2.4) Place a gear into the steel shaft in the center of the steel shaft;
(2.5) Put a three-axis sleeve into the end of the steel shaft so that the car side of the wheel assembly to complete;
(2.6) Install motors.
3. Testing:
(3.1) Power on. Check S8550 or 10ohm resistor if motors don't move.
(3.2) Install LM393 (Please pay attention to the direction of IC).
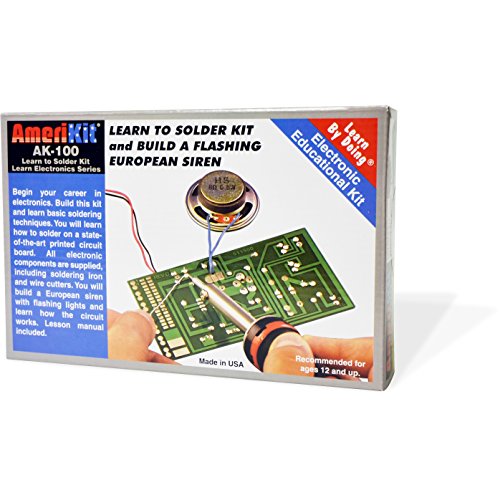
4. Elenco AmeriKit Learn to Solder Kit
Feature
Learn to solder on the special practice section of your printed circuit board (PCB)Polish your skills on the European siren circuit
Includes: solder, soldering iron and wire cutters
Use for all your soldering tasks
Ages 12 and up. SOLDERING REQUIRED
Description
A must for a budding electronics engineer learning how to solder. After practicing your soldering techniques on the special area of the board, you'll be ready to assemble a European style siren with flashing LED's. This kit also includes solder, a soldering iron and wire cutters. Needs a 9 volt battery for testing soldered circuits. This kit requires soldering.5. Soldering Project kit Solder Learning Practice for School Electronic Education, Great Fun Gift for Electronics Hobbyists and Trainer (D2-5 Smart Car Kit)
Feature
Gives Interesting Experience of Assembly - Every components and English instruction of the smart car kits are ready for you. You can really build a line tracking car from scratch and make it moves as you want, which is great achievement for hobbyists and learners.Electronic Knowledge the kits Involves - The solder practice kit involves the principle of mechanical structure, electronic, sensor, automatic control, and discipline knowledge. Which is great for students and kids learning. It's also good for keeping up with soldering if you have not done it in a while.
Practice Soldering and Learning Electronics - Why is the little car always tracking the black lines? The more you practice, the more your learning.
Design the Runway by Yourself - Just try a more interesting runway by designing your complex runway with the simplest black tape (1.5~2.0cm ) or black colored pen.
Working Voltage: 3V; Finished car size: 104*72*55mm; 2 pcs AA batteries are required. If you have any other needs, please feel free to contact us. We'd love to help!
Description
There is a 16mm wide black runway in the white field on the manual . This tracking car can drive along the black runway automatically. No matter how the runway is bent, the car can be driven automatically. You can also use the 1.5~2.0 cm black electrical tape directly on the ground to design the complex runway. It would be even more fun!With English manual and all compomnents, it is very great for teaching electronics projects, learning electronics, or just training your solder skills
Please note that the soldering project needs basic electronics knowledge.
Install Steps1Install circuit
1.1>. Solder the resistors, 8-pin IC holder, switch, potentiometers, transistors, electrolytic capacitors and the 5mm RED light-emitting diodes successively on the circuit board according to the identifiers on the circuit diagram and board.
1.2>. Pay attention to the direction of IC Socket. In addition to facilitate debugging, don't install IC LM393 yet.
1.3>. Install Mecanum wheel
1.4>. Install photoresistor
1.4>. Install photoresistor and white LED on PCB reverse.
1.5>. Install battery case.
1.6>. Test.
2Install mechanical parts:
2.1>. Install the four gaskets on the circuit board.
2.2>. Insert a steel shaft from the center hole of the wheel.
2.3>. Put a three-way sleeve into steel shaft, installed in place.
2.4>. Place a gear into the steel shaft in the center of the steel shaft.
2.5>. Put a three-axis sleeve into the end of the steel shaft.
2.6>. Finally, the two shafts on the steel shaft are fitted into the screw projections of the fixed washers.
2.7>. Install Motor.
3Power on, Test. Install LM393.
Well package and high quality customer service also helps a lot, if you have any needs, please emails us.
Are you interested in this smart car kits? Scroll up and add it to cart now!
6. Elenco FM Radio Kit
Feature
Build this kit to assemble a monophonic FM receiver (88-108mhz) with electronic auto-scanWill help you understand the basics of working with printed circuit boards
Become familiar with a variety of electronic components
Develop good soldering skills
For 30 years Elenco has been using their strong engineering and design skills to develop reliable, affordable electronic test equipment, tools, and educational kits
Description
Elenco FM Radio KitFrom the Manufacturer This kit is a monophonic FM (frequency modulation) receiver designed to receive FM signals in the frequency range (88-108mhz) it uses electronic auto-scan to search for FM stations. This scan system is done with two button switches-one switch scans up, the other resets to the start of the tuning position.
Manufactured by: Elenco
7. Elenco Scarab Robot Kit - Soldering Required
Feature
Robot uses two touch sensors to detect obstaclesWill automatically go around obstacles
Can be configured with different sets of movements
Easy to understand kid friendly step-by-step instructions
Intermediate soldering kit
Description
Scarab Robot makes use of two touch sensors to detect obstacles. When its antenna (touch sensor) detects an object in its path, Scarab will go backward first and automatically follow a two-step maneuver to help it overcome the obstacle, which can be a combination of Left Turn, Right Turn, Reverse, or Stop. The Scarab robot can be configured with different sets of movements. - THIS IS A KIT SOLDERING IRON IS REQUIRED - SOLDERING IS REQUIRED - AGES 12 AND UP8. Soldering Iron Kit with ON/OFF Switch, Rarlight 60W 110V Adjustable Temperature Welding Tool with Digital Multimeter,Soldering Tips,Desoldering Pump,Solder Wire,Tweezers,Stand,Wire Stripper Cutter
Feature
ON/OFF Switch Controled Comprehensive Soldering Kit- ON/OFF switch controled makes the soldering iron to be operated freely. Built-in ceramic heating technology not only makes the soldering iron heat up quickly but also saves energy. Adjustable temperature(200-450) design ensure your safety use. The four ventilation holes on the soldering iron gun provide better heat dissipation and it's also can extend the soldering gun's lifespanSoldering Iron Upgrade for Multimeter - Simple to use Digital Multimeter for measuring DC&AC voltage, DC and AC current, resistance, diode and continuity test. Measuring Instrument with function of data hold and read on large LCD(Battery not included)
Metal Soldering Iron Support Stand & Cleaning Sponge- Portable soldering iron stand with cleaning sponge holds the soldering iron to ensure safety and convenient use. It is much safer than any other thin and small soldering stand.The maximum extent to avoid the user get burned and damaged
Desoldering Pump & Solder Wick Help Cleaning- The desoldering pump is made of high pressure vacuum tube and aluminum body frame, which allows one-handed use, it can absorb large amounts of solder while the solder wire is better for absorbing small amounts of solder
Widely Used & Carry Portable- Soldering iron tools widely used for welding circuit board, appliance repair, home DIY hobbyists, jewelry welding.You can take it anywhere and you can find almost all tools meet your soldering needs in the PU carry bag, you can also use it together with our heat shrink tubing and get 15% off for the heat shrink tubing, if you purchase them together
Description
Why do you choose us
18-in-1 Set: This set of tools is complete,you don't need to buy the other accessories.
Safety of Tools: Soldering iron stand's dual safety design and Heat-insulated and anti-scalding silicone handle protects users from burn.
The four ventilation holes on the soldering iron gun provide better heat dissipation, which can extend its lifespan.
Easy for Storage & Carry: PU carry bag is very convenient to store small tools and easy to carry,you can take it anywhere for repair or DIY.
Warm Tips
Remove the multimeter back cover, insert the AAA battery(Battery not included).
Please be really careful when you are using the tools in avoidance of pricks or other injuries,You'd better keep it somewhere kids can't reach.
The iron heats up fast, so please select a suitable temperature. Working for long hours and high temperature may shorten its life.
Do not allow the iron to idle at operating temperatures for extended periods, This could burn the soldering iron and even other things.
Have a rest after every 10 minutes, it is good for your eye as well as the soldering iron.
Parameters of Soldering Iron
Power Voltage - AC 110V 50HZp
Input Power - 60W
Temperature Range - 200 / 392 ~ 450 / 842
Package Included
1 x Adjustable Temperature Welding Iron with ON/OFF Switch x 1
(Temp Rang: 200 - 450 )
1 x Mini Digital Multimeter (Battery not included)
5 x Soldering Iron Tips
1 x Desoldering Pump (Plastic and aluminum alloy)
2 x Anti-Static Tweezers
1 x Screwdrivers
1 x Soldering Iron Stand (Steel)
1 x Wire Stripper Cutter
1 x Electronic Wire
1 x Solder Wire
1 x Insulation tape
1 x Scissors
1 x PU Carry Bag
9. WHDTS D2-5 Smart Car Soldering Project Kits Robotics for Kids DIY Electronics Education School Competition
Feature
Wide - ApplicationSmart robot car is the most widely used in school for helping students to learn about the soldering project knowledge of mechanical structure, electronic basis skills, the principle of sensor, automatic control, soldering skill and so onEasy AssemblyThe operating principle is provided as above picture shown and we provide electronic manual for you. It's much easier to assemble which is great for kids, begginers and hobbyist.
Its PrincipleAs the light reflectivity is difererent when the light is emitting on the white and black items. It uses the photoresistance resistance to tell the smart car is on the right way or not. Smart tracking car can discriminate the direction automatically that it can run freely along the black tracking line.
Design Your RunwayYou can also use the 1.5~2.0 cm black electrical tape directly on the ground to design the complex runway. It would be even more fun!
English ManualScan the QR code in the last picture to get PDF manual or download the installation from drive.google.com/open?id=1kLlV2NlXQeXo56ItreQ1JlUParTRc-16
Description
Download the material from drive.google.com/open?id=1kLlV2NlXQeXo56ItreQ1JlUParTRc-16 or just scan QR code on the 7th picture.
1>.Install circuit
1.1 Install metal film resistor,DIP-8P IC socket,Self-Locking switch,Potentiometer,S8550, Capacitor, Red LED on PCB according to mark on PCB
1.2 Install Mecanum wheel
The support bolts of the caster are inserted into the hole, tighten the nuts screwed into the caster, and finally fit the caster and tighten.
1.3 Install photoresistor and white LED on PCB reverse
1.4 Install battery case
1.5 Testing
Install 2pcs AA battery
Press on switch.If 2pcs white LED ON,the installation is successful.If LED off,please check the welding.
2>.Install mechanical parts
2.1 Install the four gaskets on the circuit board
2.2 Insert a steel shaft from the center hole of the wheel and note that the direction is inserted from one side of the raised sleeve of the wheel. It is better to insert the steel shaft parallel to the smooth side of the wheel
2.3 Put a three-way sleeve into the steel shaft, close to the wheel, and then a gasket into the steel shaft, close to the three-way sleeve, installed in place, toggle three-way sleeve, should be flexible.
2.4 Place a gear into the steel shaft in the center of the steel shaft
2.5 Put a three-axis sleeve into the end of the steel shaft so that the car side of the wheel assembly to complete
2.6 Install Motor
3>. Testing
3.1 Power on.Check S8550 or 10ohm resistor if motor don't move
3.2 Install LM393
10. XiaoR Geek Mini Cat Smart Tracking Robot Car Soldering Project Kits for Kids Learning Electronics DIY
Feature
An educational kit for beginners (kids) to get hands-on experience about the soldering project knowledge of mechanical structure, electronic basis skills, the principle of the sensor, basic automatic control, soldering skill and so on.Easy to Assemble: It's a very simple kit, convenient to assemble the electronic components to the board by soldering.
3.It's available for you to design your runway with your imagination using 1.5-2.0cm black electrical tape to enjoy the fun, whether it's a straight or a curved road, this smart robot car can drive automatically.
4.Refined Tutorial:The kit comes with a step-by-step instructions, or if you have any questions, please contact with us directly,we will back to you within 24 hours.
5.Encourage your kids to build their robots and enjoy the fun of DIY science project, but attention that when soldering, please follow the guidance of parents.
Description
The shape of our Mini-Cat smart tracking car is based on a cute kitten-based model. The unique, cute and funny cartoon shape motivates the enthusiasm of children to learn basic component knowledge, circuit knowledge and soldering skills.Package List
2*Transparent LED
2*Potentiometer
3*Blue LED
1*Self-locking switch
2*Wheel fixed screw
5*51ohm metal film resistance
2*1K metal film resistance
2*10R metal film resistance
2*3.3K metal film resistance
2*Photoresistor
2*100ufelectrolytic capacitor
1* Universal screw
2*Pin
2*8550 triode
4*Motor wire
2*TT motor
1*Battery box
1*LM393 chip
2*Silicone holster for wheel
1*PCB chassis
2*Wheel
1*Introduction
1*Tracking map
Note: Not include 2*AA battery.